Thursday, April 29, 2010

Summer Corn and Vegetable Soup

It may not be summer but I say this soup is also perfect for Spring!  It's a light and healthy soup that makes a great meal.  The ingredients are very simple but very colorful (and colorful means healthy!).  It formed a serious symphony of mouthwatering flavor when you eat (or is it drink?...depends on if you're Asian or not haha!) this soup! 

I thought when I read the recipe that it sounded pretty good but when I tried it...wow was honestly blown away!  The picture isn't so pretty because it was in the process of cooking versus plated but don't let that keep you from trying this one.  My vegetarian friends, you know the drill: swap out the chicken broth for veggie broth and then you're golden.

One ingredient that was completely new to me was hominy.  I found both the yellow and white variety in the canned vegetable aisle near the canned corn.  I opted for the yellow one to use in my soup.  Corn seems to be the closest relative to this veggie but it's a very different texture because it's soft and kind of a bit...fluffy?  When I researched it, it said something about it being soaked in lye??  Sounds scary.  Tastes delicious.  If you absolutely cannot find hominy, I suppose you can just leave it out or sub a can of corn but it won't have the same texture and fillingness when you eat it.  So guy find and buy that hominy, will ya? :)

I can definitely see me making this soup again in the future...perhaps when my CSA share starts to roll in? Then it'll truly be Summer :).

One Year Ago: Szechwan Chicken

Summer Corn and Vegetable Soup
Printer-Friendly Version


Ingredients
  • 4 c. fresh corn kernels or 1 (16-oz.) package frozen, thawed
  • 2 c. lowfat or nonfat milk
  • 1 TBSP olive oil
  • 2 cloves garlic, minced
  • 1 large onion, diced (about 2 c.)
  • 1 medium red bell pepper, seeded and diced (about 1 c.)
  • 1 medium zucchini, (about 1/2 lb.) diced
  • 2 c. low-sodium chicken or vegetable broth
  • 1 (15.5 oz.) can yellow or white hominy, drained
  • 2 plum tomatoes, seeded and diced
  • 3/4 tsp. salt, plus more to taste
  • freshly-ground black pepper, to taste
  • 1/2 c. fresh basil leaves, cut into ribbons
Directions
  1. Heat the oil in a large soup pot over a medium-high heat. Add the garlic, onion, bell pepper, and zucchini and cook, stirring until the vegetables are tender, about 5 minutes.
  2. Add the hominy and the broth and bring to a boil.
  3. Meanwhile, put the thawed corn and milk into a blender or food processor, until smooth.
  4. Add the pureed corn and tomatoes and cook until warmed through, but not boiling. Add the salt and season with pepper. Serve garnished with the basil ribbons.
Source: As seen on and adapted by Apple A Day, Originally from Ellie Krieger, The Food You Crave

Saturday, April 24, 2010

Slow Cooker Carnitas

Pssst...did you miss me?  Probably not as my readership isn't all that high.  I apologize for not blogging in nearly 2 weeks...I'm such a bad blogger! :( *goes and runs to hide in the corner*.  Don't worry, I'm still alive, and I'm still cooking.  And, I'm apparently behind by blogging recipes from MARCH when it's nearly the end of April.  My bad. 

I'll admit, I've been a slacker on not just blogging but also with Jazzercising lately.  I used to try to blog about every 2-3 days but now I'm lucky to do once a week.  I'm down to an average of 2 days per week Jazzing instead of my 3-4 that I was doing previously.  I think prepping for and then going to DC for Easter weekend just threw off my rhythm.  And then there's the whole getting ready for big Euro vacation and the nail biting with the Icelandic volcano whose name nobody can actually say.  I hope that once vacation time is over I can ease back into my routine of not just cooking but also blogging about it in a timely manner and exercising more to make sure I don't pack on any extra pounds (especially after eating such delicious foods abroad!).

OK.  Now back to the reason you're probably here - this slow cooker carnitas recipe.  I remember when I cooked this meal (apparently on March 18th based on the photo timestamp) I was so impressed by how flavorful it was to cook.  And better yet, it was way easy...like a good crockpot recipe should be!  The slow cooked meat shredded easily and practically melted in your mouth.  If you don't eat pork, no worries, I would not hesitate to use this same recipe on a different type of meat like chicken or beef because it was a serious fiesta of flavors in your mouth!  In fact, I used beef this time because I had a 2 pound chunk already in the freezer that needed using up.  The cumin gave the meat a nice smokey flavor and the citrus juice gave it some zip and brightness.  Delicious and will definitely make again because I LOVE Mexican food :).

Slow Cooker Carnitas
Printer-Friendly Version


Yields: 6 Servings

Ingredients
  • 2 pounds pork shoulder (or equivalent of your choice of meat)
  • 1/2 cup freshly squeezed orange juice (about 1 large orange)
  • 1/4 cup freshly squeezed lime juice (about 1 large lime)
  • 7 cloves garlic (whole intact)
  • 1/2 tablespoon kosher salt
  • 1 tablespoon cumin
  • 1/2 cup beef broth
  • corn or flour tortillas
  • toppings: sour cream, salsa, cheese, onions, bell peppers, sliced avocado, etc (optional)
Directions
  1. In a small bowl, combine the salt and cumin. Rub mixture all over the pork, then put into a 6 quart slow cooker. Add whole garlic cloves. Squeeze on the citrus, and pour the beef broth evenly over the top.
  2. Cook on low for 8-10 hours, or until the pork shreds quite easily with a fork. Shred meat fully and serve on warmed tortillas with desired toppings.
Source: A Year of Slow Cooking

Tuesday, April 13, 2010

Blueberry Citrus Cake

Happy (Belated) First Birthday Blog!  And, Happy Birthday to my Mother-in-Law Mary Lynn!

In a way, this is a faux birthday for the blog because I didn't actually start this public blog until the Fall of 2009.  However, it's been a year since I first started sharing recipes with my friends and family on our personal website, the Chronicles of the Chrises and those recipes were loaded with backdates this this website.  Back when I started blogging recipes, it was just a way for me to share family recipes and things that I was cooking with those that were close to us.  Back then, I didn't know about food blogging ettiquite but I now know and make an effort to take my own photos.  Eventually I thought why not start a public blog and this blog was born with a name to mirror our other more life-centric website. 

I also can't believe the improvement to my skills that's happened through the past year or so.  Honestly, I used to be kind of the black sheep of my extended family because I NEVER cooked and came from a family of cooks/restaurant owners.  Cooking became a necessity when I was living on my own in college.  It was learn to make food to eat or eat out...which on a poor college student's budget isn't so friendly on the pocket books.  I started by committing myself to trying at least 1 new recipe a week.  After I got married about 2 years ago, the domestic bug must have bit because then I started cooking even more.  I wanted to be a good wife and have dinner on the table for my husband by the time he got home from work!  And most recently, we bought a house last Fall and we gutted our entire kitchen on the same day that we closed.  We remodeled and put in a beautiful gourmet kitchen and I'm so glad that we did because nearly all my free time is spent in the kitchen trying new recipes now.  Hey, gotta get our money worth, right? :)

What I'm not new to is the concept of social media and blogging.  I grew up with the Internet (Prodigy shout out!) and chat rooms (Microsoft Comic Chat woot!).  I had to take a mandatory typing class in Junior High and because I'd been typing since I was like 6 I came into the class typing faster and more accurately than the teacher.  (Unfortunately, they made me take the class anyway...waste of time!).  I have had a personal blog since at least 2001...maybe even 2000 (I'd have to go back and see).  I distinctly remember writing about September 11th in it and was so proud that I've kept posting to it through all these years.  (I think I have to go and get my 2010 post in there!)

Anyway, I hope that you enjoy the recipes that I share with you.  This particular one is deliciously light and refreshing.  I made it for Mary Lynn's birthday and we all really enjoyed it.  I will be making this one again!  Since I started making a lot of things from scratch I've generally started turning my nose up to boxed mixes but this recipe just uses the boxed mix as a base and then adds all these delicious goodies like zested lemon and oranges, blueberries, and a homemade frosting.  In my eyes, this still makes it homemade!

I'm sorry but my sucky photo taking skills don't do this cake justice at all and you must try it!  And/or go to the Better Home and Gardens site where I found the recipe to see a prettier professional picture.  It's the perfect cake for Spring and Summer!

One Year Ago: Crockpot Turkey and Cakeballs

Blueberry Citrus Cake
Printer-Friendly Version


Prep Time: 30 min
Bake Time: 35 min
Cool Time: 2 hours
Yields:  12 Servings

Ingredients
 
For the Cake
  • 1 package 2-layer-size lemon cake mix
  • 1/2 cup orange juice
  • 1/2 cup water
  • 1/3 cup cooking oil
  • 3 eggs
  • 1-1/2 cups fresh or frozen blueberries
  • 1 tablespoon zested orange peel (from approximately 1/2 large orange)
  • 1 tablespoon zested lemon peel (from approximately 1 medium lemon)
For the Citrus Frosting
  • 1 (3 oz) package cream cheese, softened
  • 1/4 cup (1/2 stick) butter, softened
  • 3 cups powdered sugar
  • 2 tablespoons orange juice
  • 1 cup whipping cream
  • 2 tablespoons zested orange peel (from approximately 1 large orange)
  • 1 tablespoon zested lemon peel (from approximately 1 medium lemon)
Directions

To Prepare Cake
  1. Preheat oven to 350 degees F. Grease two 8 inch or 9 inch round baking pans; set aside.
  2. In a large mixing bowl combine cake mix, orange juice, water, oil, and eggs. Beat with an electric mixer on low speed for 30 seconds. Increase speed to medium; beat for 2 minutes. With a wooden spoon or rubber spatula gently fold in blueberries, orange peel, and lemon peel. Pour batter into prepared pans.
  3. Bake for 25-30 minutes (9 inch pans) or 35-40 minutes (8 inch pans) or until a wooden toothpick inserted near center comes out clean.
  4. Cool layers in pans on wire racks for 10 minutes. Remove cakes from pans. Cool thoroughly on racks. While cake is cooling, prepare Citrus frosting using the directions below.
  5. Frost cooled cake with Citrus Frosting. Garnish with orange peel curls, if desired. Store frosted cake in the refrigerator.

To Prepare Citrus Frosting
  1. In a medium bowl beat together softened cream cheese and softened butter until fluffy.  Add sifted powdered sugar and orange juice. Beat until combined.
  2. In a small bowl beat whipping cream to soft peaks; add to cream cheese mixture.
  3. Add zested orange peel and zested lemon peel. Beat on low until combined.
Source: Better Homes and Gardens

Monday, April 5, 2010

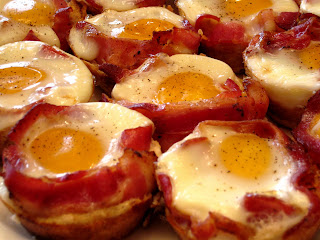
Bacon Egg and Toast Cups

In my mind, this recipe was the surprise favorite from my personal menu contributions for our Breakfast Themed Dinner Club.  Funny how that works since this one had such simple ingredients and was the easiest to make in bulk!  Or, maybe it's because this was a blog recipe (vs. All Recipes) and I generally have better luck with those.  You can bake up to 2 muffin tins (24 bacon egg and toast cups) at the same time so it's a great recipe to serve for to a crowd.  They're great snacking and finger foods which are generally popular in our dinner club crowd.  And, they can be saved and re-heated in the oven or toaster oven for later.  These made an awesome lazy breakfast the morning following our gorge fest.  Yum!

I'll say that I've always been slightly afraid of eating my eggs any way except for scrambled, hard boiled, or in an omelette because there's something about liquidy egg yolks that just gross me out...that and a fear of contracting samonella.  The eggs in this recipe when cooked as directed are still runny but you can cook them longer (watchout, this could result in a rubbery egg white though).  Since I did make this recipe, I gave the recipe a try...runny yolks and all.  I'm happy to report that I did not get sick and I actually enjoyed it!  This recipe has converted me..at least in this application.  I'm still not a sunny-side up girl and will stick to my fully cooked yolks, if at all, for other egg applications!

I can also see this recipe with a variet of twists - added ham bits, peppers, onions, mushrooms, different types of cheese and/or bread.  The possibilities are endless!

The Noshery, the blog from which I found this recipe, also has a version that is french toast cups stuffed with sausage and apples that I'd like to try sometime.  I think I'd have more luck with Chris eating that one over this one which is clearly eggy.  Of course, with all the other stuff I was making for this round of dinner club, that recipe will have to wait for me to make it another time!

My personal contributions for this dinner club consisted of:
Check out our Dinner Club blog for some additional yummies from my friends!

Bacon Egg and Toast Cups
Printer-Friendly Version


Yields: 6 cups (can easily be doubled, tripled, or even quadrupled for a crowd!)

Ingredients
  • 6 slices of bread (I used wheat)
  • 6 slices of bacon
  • 6 eggs
  • 1/2 cup of shredded cheese
  • salt and pepper, to taste
Directions
  1. Preheat oven to 400 degrees. Spray muffin pan with butter non-stick spray.
  2. Using a cookie cutter or a wide-mouthed glass, cut circles out of bread slices about 3 inches in diameter.  Take bread circles and press them into the muffin pan, set aside.
  3. Heat a large skillet on medium-high. Cook bacon on the skillet until partially cooked but still pliable, about 3 minutes. 
  4. Shape bacon strips into the toast cups, fill with 1 Tablespoon of shredded cheese. Place in the oven for 5 minutes, allowing the bacon to toast just a little more. Remove from oven.
  5. Crack an egg and drop a whole egg into the cup, sprinkle with salt and pepper to taste. Repeat for remaining cups. Place back in the oven and cook until white begins to set, about another 8 – 10 minutes. The yolk should be creamy. If a more fully cooked yolk is desired, continue cooking until desired done-ness is achieved.
  6. Remove from oven when done and pop out using a spoon, serve warm.
Source: The Noshery

Pancake Syrup

This is another item on my Make Your Own Belgian Waffle Bar that was featured in our Breakfast Dinner Club last month.  Who would have known that making your own syrup was so easy?  This is perfect as your regular syrup or when you're in a pinch and run out of the store-bought stuff.  And, it's very cost effective to make.  You can store any extra in the fridge and then re-heat it when you're ready to use it again.

Sorry, no pictures of this one but I think you all know what syrup looks like.  This one had a nice syrupy consistency and a beautiful dark amber color.

My personal contributions for this dinner club consisted of:
Check out our Dinner Club blog for some additional yummies from my friends!

Pancake Syrup
Printer-Friendly Version

Prep Time: 15 Min
Cook Time: 7 Min
Ready In: 30 Min
Yields: 12 Servings

Ingredients
  • 3/4 cup packed brown sugar
  • 1/4 cup sugar
  • 3/4 cup water
  • 1/2 cup light corn syrup
  • 1/2 teaspoon maple flavoring
  • 1/2 teaspoon vanilla extract
Directions
  1. In a saucepan, combine the sugars, water and corn syrup; bring to a boil over medium heat. Simmer for 7 minutes or until slightly thickened.
  2. Remove from the heat; stir in maple flavoring and vanilla.
  3. Cool for 15 minutes. Serve over pancakes, waffles or French toast.
Source: All Recipes

Strawberry Topping

This Strawberry Topping was made for our March Breakfast Themed Dinner Club as part of our Make Your Own Belgian Waffle Bar.  It was rediculously simple to make and tasted very fresh.  I added some lemon juice to brighten up the flavor.  Excellent on waffles, pancakes, ice cream, or cheesecake!

My personal contributions for this dinner club consisted of:
Check out our Dinner Club blog for some additional yummies from my friends!

Strawberry Topping
Printer-Friendly Version


Prep Time: 15 Min
Cook Time: 5 Min
Ready In: 35 Min
Yields: 4 Servings

Ingredients
  • 1 pint strawberries, cleaned and stemmed
  • 1/3 cup white sugar
  • 1 teaspoon vanilla
  • 1 Tablespoon lemon juice
Directions
  1. Cut about 1/3 of the strawberries in half.
  2. In a saucepan over medium high heat, combine uncut strawberries, sugar, vanilla, and lemon juice. Cook, stirring occasionally and smashing strawberries with spoon as they soften, until sauce thickens, about 5 minutes.
  3. Remove from heat. Add remaining 1/3 of cut strawberries into cooked mixture. Store in refrigerator to cool before serving over waffles, pancakes, ice cream, or cheesecake.
 Source: Slightly modified from All Recipes

Belgian Waffles

These Belgian Waffles were made for our Breakast Themed dinner club last month and were the star of our Make Your Own Waffle Bar.  They are extremely light and fluffy in texture.  We put out chocolate chips, peanut butter chips, chopped pecans, blueberries, bananas, strawberry topping, whipped cream, powdered sugar, and syrup so that people could put their personal touch to their waffles. 

The original recipe says the beat the whites and yolks separately to create a light and airy waffle but I don't think this is necessary because by the time you let the batter rise and go to cook the waffles, the air that was whipped into the whites would have separated.  If you want to do this step, however, I suggest mixing the beaten egg whites into the risen batter just before cooking.  Because this recipe uses yeast as the leavening agent, you do need to allow some advance preparation.  Some reviews say that you can mix the ingredients together the night before and then allow it to come up to temperature and finish rising the next morning so that you can have fresh waffles bright and early.

It was interesting to see how as people started to arrive and our house began to get warm from the body heat, the yeast in the batter really went into over-drive and got extra airy.  At the end of the night, we had some extra batter leftover so I made them up and let them cool before freezing them in a ziplock baggy.  They re-heat really well in the toaster (like an Eggo)!

Sadly, I don't have a picture of any waffles but I do have a picture of the waffle bar setup itself.

My personal contributions for this dinner club consisted of:
Check out our Dinner Club blog for some additional yummies from my friends!

Belgian Waffles
Printer-Friendly Version


Prep Time: 15 Min
Cook Time: 20 Min
Ready In: 1 Hr 35 Min
Yields: 8 Waffles

Ingredients
  • 1 (.25 ounce) package active dry yeast (2.5 tsp)
  • 1/4 cup warm milk (110 degrees F/45 degrees C)
  • 3 large eggs
  • 2 3/4 cups warm milk (110 degrees F/45 degrees C)
  • 3/4 cup butter, melted and cooled to lukewarm
  • 1/2 cup white sugar
  • 1 1/2 teaspoons salt
  • 2 teaspoons vanilla extract
  • 4 cups all-purpose flour
Directions
  1. In a small bowl, proof yeast by dissolving the yeast in 1/4 cup warm milk. Let stand until small bubbles form and it looks frothy, about 10 minutes.
  2. In a large bowl, whisk together the eggs, 1/4 cup of the warm milk and the melted butter. Stir in the yeast mixture, sugar, salt and vanilla. Stir in the remaining 2 1/2 cups milk alternately with the flour, ending with the flour. Cover the bowl tightly with plastic wrap. Let rise in a warm place until doubled in volume, about 1 hour.
  3. Preheat the waffle iron. Spray waffle iron with cooking oil and spoon about 1/2 cup (or as recommended by manufacturer) onto center of iron. Close the lid and bake according to manufacturer directions. Serve immediately or keep warm in 200 degree oven.
Source: All Recipes

Country Fried Steak

I know, I know.  I keep saying this but truly this next batch of recipes is super behind.  The only reason I realized I am so late is because our next dinner club is this weekend and I realized that I still haven't posted the recipes from our LAST month's dinner club.  D'oh!

Anyway, March was Chris and my turn to host again and I decided to do a Breakfast Theme....or better known as "brinner" (breakfast for dinner!).  It was an awesomely delicious smorgasborg of food and I must say that being a breakfast lover, I was in absolute heaven!  In our typical Dinner Club style, we made wayyyy too much food and pretty much binge ate.  Fruit bruschetta, fruit tart, quiche, gooey breakaway cinnamon rolls, belgian waffle bar, bacon egg and toast cups, and country fried steak....*die*.

My personal contributions for this dinner club consisted of:
This post is about the Country Fried Steak (sometimes known as Chicken Fried Steak)...one of my favorite unhealthy breakfast entrees!  The flavor of this one was good but we all know I don't like to fry stuff so I have NO IDEA why I chose to take this task on.  Especially given that I had to fry up 10 of them and was running out of time (guests arrived when I was just starting to fry)!  I don't think I did a very good job paying attention to making sure the oil was at a good frying temperature because some of the breading ended up soggy and others a little burnt.  And, the meat was tougher than I would have liked.  Perhaps if you made a smaller batch you could be more attentive and it would turn out better.  Like I said, great flavor but not the best execution which was entirely my fault.  (Good thing I made other delectable goodies to make up for this less than stellar one!)

Pardon the awful picture.  Like I said it was a busy day in the kitchen and I think I bit off more than I could chew for this one.  To be honest, I'm surprised I got a shot at all!  Oh and by the way, this is the reason I had a TON of buttermilk leftover and hence all of the other recipes to use it all up!

Check out our Dinner Club blog for some of the other aforementioned yummies, too!

Country Fried Steak
Printer-Friendly Version


Prep Time: 20 Min
Cook Time: 20 Min
Ready In: 40 Min
Yields: 4 Servings

Ingredients

For the Steaks
  • 4 (1/2 pound each) beef cube steaks
  • 2 cups all-purpose flour
  • 2 teaspoons baking powder
  • 1 teaspoon baking soda
  • 1 teaspoon black pepper
  • 3/4 teaspoon salt
  • 1 1/2 cups buttermilk
  • 1 egg
  • 1 tablespoon hot pepper sauce (e.g. Tabasco™)
  • 2 cloves garlic, minced
  • 3 cups vegetable shortening for deep frying
For the Country Gravy
  • 1/4 cup all-purpose flour
  • 4 cups milk
  • kosher salt and ground black pepper to taste
Directions
  1. Pound the steaks to about 1/4-inch thickness.
  2. Place 2 cups of flour in a shallow bowl. Stir together the baking powder, baking soda, pepper, and salt in a separate shallow bowl; stir in the buttermilk, egg, Tabasco Sauce, and garlic.
  3. Dredge each steak first in the flour, then in the batter, and again in the flour. Pat the flour onto the surface of each steak so they are completely coated with dry flour.
  4. Heat the shortening in a deep cast-iron skillet to 325 degrees F (165 degrees C). Fry the steaks until evenly golden brown, 3 to 5 minutes per side. Place fried steaks on a plate with paper towels to drain.  If needed, keep steaks warm by placing in a warm oven. 
  5. Drain the fat from the skillet, reserving 1/4 cup of the liquid and as much of the solid remnants as possible.   Return the skillet to medium-low heat with the reserved oil. Whisk the remaining flour into the oil. Scrape the bottom of the pan with a spatula to release solids into the gravy. Stir in the milk, raise the heat to medium, and bring the gravy to a simmer, cook until thick, 6 to 7 minutes. Season with kosher salt and pepper. Spoon the gravy over the steaks to serve.
Source: All Recipes